

Tea Pots Workshop (1st and 2nd day)
On the first day of the tea pot workshop Claude Merveille first gave us som theoretical information about tea pots. The right proportions of a pot, handle and lid and pouring part is very important. He told us that the opening for the lid has to be not too big. Through this opening, the tea could cool down, if too big. It's also important that the lid fits well on the pot and that it doesn't fall off when pouring the tea. There needs to be a good balance of the tea pot when lifting it to pour the tea. The shape, the size, everything has its reason. Claude made a lot of drawings, which you can find in the pictures gallery.
Then he spent quite some time regarding the pouring nose of the tea. I call it that way cause I think it's funny. The shape of the nose where the tea pours has to be of a specific shape, so the tea doesn't slide along the teapot when you stop pouring... And that is not an easy part! I remember looking for info on various websites and couldn't really find a correct explanation. I think every potter has his own theory and Claude gave us his. Opening up the nose and then when leather hard it can be cut with a wire at the same level of the teapot. It's also very important that the level of the upper part of the nose is at the same level as the lid. If not you cannot put a lot of tea in the pot! And that is just the purpose of the tea pot! Nevertheless, the size can vary of course. In my picture gallery I posted some pictures of tea pots that I particularly like. There is one with a little lion on top (golden) that I find very nice and also the one on three little pointy feet.
After the theoretical part there was the practical part. Wilfried was the only potter that didn't have any throwing experience. So he made a couple of pots using other techniques. Evelyne, Marianne, Luc and I sat at our wheels and tried tu put in practice what we just learned.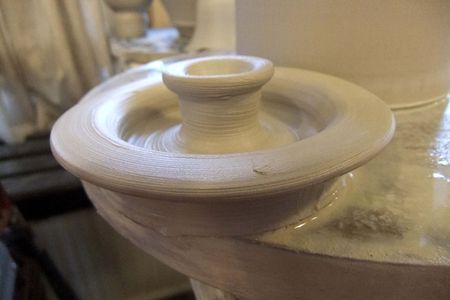
I also learned a new way of making lids. You turn it side up and the side on which the lid rests is pushed aside when turning. The lid is made of one piece of clay and there is not much trimming neede afterworths. It's the kind of lid that falls in the pot and rests on its side. An example you can see on this picture.
Other lids you can simply throw upside down. You then let it rest till it's somewhat dryer and harder and then you can trim the other side. You can make a nice button for lifting the pot. Note that it the button is large you need to make it hollow... or it can burst.
After a week of resting in the fridge the tea pots were leather hard. Ideal to work with. It's the part where you assemble the tea pots, watch for details, trim the bottom and eventually the whole pot. When assembling every part is cut to the right size and "glued" with a mixture of dry clay and water. Makes a kind of putty that sticks two parts very strongly. After doing this you can fix the two parts really tight together using some more clay which you shape into a very fine sausage. It is then pressed allo around the part that needs to be fixed and with the use of your finger or some tools, a brush and water you can make the surface very smooth. It's important (that is if you want that) to have a smooth surface and that two parts just slide into eachother. The weld shouldn't be visible. Note that with the glaze you can also cover up some mistakes, but note that if a part is not well stuck to the other you can have problems : a leak, the handle that breaks off,...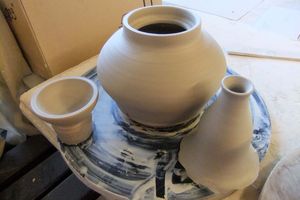
Soon, the two pots I made, will go into the kiln for the "Biscuit" firing. Next part will be the glazing. But first they need do dry very slowly. As Claude told us, the body of the pot is large and will take a longer time to dry than for instance the handle. If this handle dries too quickly it could simply break off. So everything is covered in plastic foil, with a small whole letting the air in and the humidity out very slowly. 3 weeks of drying should be good.
So I would say, patience... to be continued! And I am looking forward to seeing the results of the other potters that took the same workshop!
In April I will be glazing the tea pots, i.e. if they have lived through the drying and firing process!
Enjoy the rest of the pictures in the tea pot gallery!


/https%3A%2F%2Fstorage.canalblog.com%2F05%2F38%2F711556%2F72241312_o.jpg)
/https%3A%2F%2Fstorage.canalblog.com%2F15%2F04%2F711556%2F69475773_o.jpg)
/https%3A%2F%2Fstorage.canalblog.com%2F67%2F57%2F711556%2F69474408_o.jpg)
/https%3A%2F%2Fstorage.canalblog.com%2F68%2F64%2F711556%2F62232820_o.jpg)
/https%3A%2F%2Fstorage.canalblog.com%2F18%2F87%2F711556%2F50227413_o.jpg)
/https%3A%2F%2Fstorage.canalblog.com%2F25%2F28%2F711556%2F49715849_o.jpg)
/https%3A%2F%2Fstorage.canalblog.com%2F73%2F68%2F711556%2F49712734_o.jpg)